Search This Blog

Monday, May 30, 2011

Hooded bath towels....

So last week while I was cruising blog tutorials; I ran across a picture of a hooded bath towel.  I thought it would be pretty cute to make them for my boys!  So I searched several tuts and came up with my own version of a couple pictures that I liked!

I ran right to the towel section at K-Mart - Christian picked yellow - and decided that Nathan needed blue. 

I set to cutting and sewing as soon as I got home - It didn't take me long ~

TO SCREW UP!!!!!!!


*Kitty* likes Christian's ~ Notice her paw scratching at his!!  So can you see where I went wrong!?  Yeah - unless I have children with the Jolly Green Giant (which I do not!) then these towels are wayyyyyyyy to long!

I totally didn't look at my pictures or plans before I jumped right into sewing on these!  I put the hood on the ends instead of the middle of the long edge!  Therefore - the names are on wrong too!  And let me tell you - they were a big super huge PITA!!!  I am not a great applique'r!! 

So what kid wouldn't like a ginormous super hero cape; right?  I went out and bought 2 more bath sized towels in the same blue and yellow - (good thing they were on sale AND I had the Kmart savers card!)  I used the extra halves of the hand towels for the hoods - but - what was I going to do about the names on the back?  I really did NOT want to re-applique the letters!

So I cut around the names, centered them on the back of the new towels, and zig zagged around them with rainbow colors!


TA DA!!!!


I think the boys like em'!  We had already had our baths for the night when I finished them ~ so they are going to have to wait until tomorrow to really test them out!!


LOVIN' the Cone Head look!!!


He kept saying *CHEESE* even though his back was to me!!  What a nut!

So here is a quick run down of how I made them:

Materials:
1 regular sized bath towel
1 hand towel (for the hood)
fleece
thread

*take your hand towel and fold it in half on the short sides and cut it so you have 2 (you only need 1 half for the hood - save the other half for a second hood!)

*fold this half of towel short ends together and sew along edge.  Turn it right side out.

*pin your hood in the middle of the LONG edge of the bath towel and sew

* if you'd like to put names or shapes, I used fleece because I had it - I suppose  you could use flannel or different colored towels.  Cut out your letters and pin and zig zag around them!

You're done!

Happy crafting!
Steph


Friday, May 20, 2011

Sweater balls?? I think so!!!


I have an addiction to making *things* out of other *things*.  Curtains out of sheets, swags out of eggs, mittens from sweaters;  you get the idea!  So while I was searching through the "wireless highway" of treasures I could make out of crap I already have I came across a simple picture of a colorful ball made out of old sweaters!

So I thought because I had an entire garbage bag full of old sweaters in my ginormous closet of "junk I need to make other junk" (I have them to make more mittens!)  I would try and make a cute little baby ball.  But I wanted to make it more my own creation and not just like the one I saw in the picture.  So I added tags from different types of  ribbon and ric rac!


I made a pattern kinda in the shape of a leaf and cut away at my sweaters.  The sleeves were the perfect size- plus then you can cut 2 at a time!  Then it was trial and error - I pinned and added my loops as I went in a random order - After I was done sewing the actual *leaf* pieces together - the top and bottom were open so I turned it right side out and stuffed the day lights out of it!  This thing is SSSSOOOOO soft and squishy! 

Then I sewed up the top and bottom.  All I did was line the points together and quick hand stiched it, because it was going to be underneath the little circle anyway.  Then I cut 2 circles out of the cuff of one sweater.  I traced a spool of ribbon for my circles.  Then I pinned them down and with 3 strands of embroidery thread I stiched around each circle!

VIOLA!  A cute, soft, safe, GREEN gift for a tiny little person!  If you should have any variation or suggestions I would love to hear them!

Happy crafting
Steph

Monday, May 16, 2011

COLORS!!

sorry for the poor quality in the photo - I had the digital zoom on!
I haven't had this much color at one time in our yard EVER!  I find it so calming to sit and watch out the window some of God's tiniest creatures.  Here are a few pictures of the lovely colorful birds that I have had the pleasure to watch between yesterday and today!


I actually had 3 indigo blue buntings but one flew as I snapped the picture!


this one was taken through a cloudy window - every time i had the window open he would fly away too soon!

we have the mama cardinal as well - but she must have been hiding!


We also have a handful of gold finches but they weren't anywhere to be found when I had the camera out!

This is also the first year in many that I have had any luck with my tulips growing!  Usually I am lucky if I get 4 of them to grow!  This year I have 15!!!!!!!!!!  Here are a few shots of those beautys as well!!! 


Blue sky, my white rocking chair on the porch, birds and flowers......I am at peace!

Friday, May 13, 2011

HAPPY BIRTHDAY TO MY BEST FRIEND!

Yesterday was my husband Ron's 43rd birthday! (I posted this yesterday but it disappeared!)  He is a hobby farmer.  If he could make a living at farming he would!  He told me that he didn't want a big fancy cake.  I DON'T EVER listen to him!


I think this may be the only garden he gets this year unless Mother Nature decides to make it stop raining so it can dry up out there!!!

I love him to the ends of the Earth - and if taking the extra time to make him an extra special birthday cake makes him smile- then that's the least I can do!!

happy cake eating!
Steph

Wednesday, May 11, 2011

Something I've wanted to do forever.....

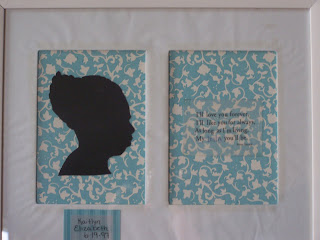
When my husband told me that it was time to start taking down wedding pictures in our room (the honeymoon is over I guess!) I knew exactly what I was going to replace some with!

I have always wanted to put up the silhouettes of my kids!  So i found some scrapbook paper that matched my room (teal and brown!) and created my materpieces!


 The quote on my daughter's picture is from our favorite book!  I'll Love you Forever! 

I am not sure if I like the name/birthday tags underneath.  What do you think?  Any suggestions?

Tuesday, May 10, 2011

FAMILY!

I joined the latest craze and found myself cruising the many pictures pinned on Pinterest!  I am still learing the ins and outs of it - but this photo caught my eye! 


My husband has been hounding me to take down the wedding pictures in our room (guess the honeymoon is over!)  But I wasn't taking them down without having something to replace them!  

I had to make this!  But I wanted to make it my own!  Here's what I came up with!


sorry for the bad picture!  I tried several angles and nothing would work!
I added a heart to the center and changed the year to the word family!!  I love love love the way this turned out!  You can't really see my youngest's yellow handprint - look closely - it;s there!

Then I needed something to go along with this so I made a coordinating picture.  This one hangs below the whole family! 


sorry for the really bad pic again!!
It reads - "children leave handprints on your heart"  I love this one too!  I can't keep my kids little forever - so at least I have these hands to keep!!

happy crafting!
Steph


MOON SAND....Almost!!

I've never bought the stuff for my kids!  We've played with it before ~ but always at someone elses house so the mess stays there!!  I love the way it feels - so soft and almost velvety; and how do they make it??

Well I was cruising blogs and discovered a recipe to make your own!  It called for play sand, corn flour, and water.  I have looked and looked for corn flour!  I live in the boondocks of Michigan sooooo I guess that is making it impossible to find it!  So then I checked out some other sites and their directions called for corn starch instead!  So that is what we went with!

The kids mixed together the sand and cornstarch - then I added the water - after seeing how it turned out I would have added the water a little at a time!  It ended up very wet or slimy!  Kind of like the original "oobleck"  - looks wet but felt dry to the touch!    Here's what it looked like!  I think because my bag of clean sand box sand was damp I didn't need as much water.


looks wet - but felt dry to the touch!


It didn't matter to my 2 youngest boys - who stayed at the table the whole outside time!  I put the small sand molds out with it - however we couldn't get the sand out!!!   


It was a huge fine motor and sensory experience for my *littles*!!!  Look at the concentration on the little guys face trying to work with the sand!!!


Great for working their little hand muscles!  As it dried I crumbled the chunks and it was more like the real "moon sand"!  We were able to put it in the molds then and have the shape hold!! 


When we were done I stored it in an ice cream bucket with a lid.  Then later in the day I remembered seeing on one of the sites that they added baby oil to their mixture to prevent the drying out.  I did this later on and it worked great!  It made the sand smell good too!  So all in all - we had a pretty good experience with this and will definately make it often!  But we will still only use it outside!!! (my floor OCD still gets the best of me!)   Maybe on rainy days we will put the kids picnic table on the covered front porch and use it there! 

here's how I made it:

6 cups of  clean sandbox sand
3 cups of corn starch

mix these 2 together very well

1 1/2 cups of water - add a little at a time to the mixture above until you reach the desired texture

baby oil 
squeeze into the mixture I just added until the mixture felt smooth and not dry

I still plan on trying to find corn flour and making it with that to compare to 2!  I'll let you know if I get a chance to make it!

Happy crafting!
Steph

Thursday, May 5, 2011

Who Wouldn't want a FREE Cricut???

Well here is a link to a giveway!!!  The new anniversary Cricut Expression 2!!  You can enter daily - and get extra enteries for blogging and tweeting!!!  But no need for you to enter - because it has my name written all over it!!!  HAHA  No seriously - good luck!!

http://www.favecrafts.com/sweeps/Cricut-Expression-2-Anniversary-Edition-Giveaway


Happy Crafting
Steph

Tuesday, May 3, 2011

Fabric covered composition notebook - part II ~


I find that I take a notebook pretty much everywhere that I go!  So I wanted to have something that catches your eye! 

I had a chance to finish up the set of composition notebooks that I had started yesterday.  These have fabric permanently attached to the covers.  


Then I decided that I wanted to jazz them up a little bit.  So I added bright ribbons and buttons!


I am thinking that maybe these would make good gifts for some little holiday!


I have 3 lovely ladies in our lives that would probably like to get one of these!!


My 13 year old daughter tried to confiscate this *toadstool* one - but didn't succeed!!!  It's my FAVORITE!  I thought of you LISA when I added the rainbow buttons to this one!!!

So maybe, just maybe these will get wrapped up for gifts - or maybe I will just hog them for myself!!

Happy crafting
Steph